Welcome! Let's print out a beautiful and secure wallet for your s.
Here's an overview of what will happen, step by step.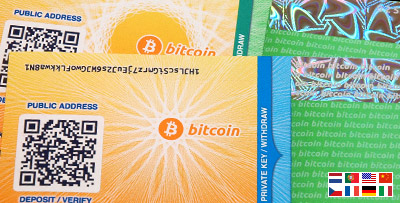
Basic security checklist:
- ? Are you using a secure operating system installation guaranteed to be free of spyware and viruses, for example, an Ubuntu LiveCD?
More security tips and answers to frequently asked questions »
Change your wallet's design, language, or cryptocurrency here:
Step 1: Calibrate PrinterBefore printing out a wallet you may need to calibrate your output using the zoom and horizontal shift adjustments to account for your particular browser and printer combination. Otherwise, your wallet's back side may not line up with the front side.
Step 2: Print Front
Next you will print out the front side of your wallet. The public address and private key will be random-generated, or you can supply your own key by rolling dice, shuffling cards, etc. You may also duplicate an existing paper wallet or provide a "vanity" address if you have one. Tip: If you are printing several wallets, it's possible to print two per page.
Step 3: Print Back
Flip the front page over and put it back in your printer. This isn't just for good looks! The reverse design includes important tamper-resistant safeguards.
Step 4: Cut, Fold, Seal & Fund
Find your scissors! The final step is to cut out your wallet, fold it, and seal it with tamper-evident hologram stickers or at least opaque (light-blocking) tape. Now you're ready to transfer funds from your online holdings to your new wallet.
90 second tutorial video on YouTube »
Order hologram stickers / zip bags / Ubuntu CD »
The calibration step helps line up the front and back sides of your printout. Print out this page in LANDSCAPE ORIENTATION (wide instead of tall.) Based on the results, adjust the "zoom" and "horizontal shift" in the upper-right corner of this page and keep printing tests until:
(1) Your printed ruler is horizontally centered on the page, leaving equal margins on the left and right sides of the page. (INCREASE the horizontal shift to push the ruler to the right.)
(2) Your printed ruler is approximately the same size as a real ruler. Smaller by up to 1 inch is fine. (REDUCE the zoom to increase the ruler size.)
What settings worked best for you? Feedback form »

About "BIP38" Encryption
The advantage with BIP38 is that if your paper wallet is stolen or compromised, the private key cannot be recovered without your password. Even a very short password adds a strong degree of protection. However, if you encrypt your private key with BIP38 and you lose your password, it will be impossible for you to recover the funds you have sent to this wallet.
Also, note that not all wallet applications or web services are able to import or "sweep" BIP38 encrypted keys. In this case, you will have to use the Validate or Decrypt feature on this webpage to reveal the unencrypted Wallet Import Format (WIF) key as an intermediate step before sweeping the balance.
WARNING: Before sending any funds to a BIP38-encrypted wallet, first do a test make sure you are able to decrypt the printed private key back to ordinary WIF format.
Unless you have a strong understanding of the BIP38 encryption and decryption workflow, click cancel, print your paper wallet without BIP38, and just keep it safe and hidden like you would jewels or cash.
Receive bitcoin to your wallet using your PUBLIC key.
Your private key is: 14DeLtifrayJXAWft3qhPbdY4HVJUgMyx1
Access bitcoin in your wallet using your PRIVATE key.
Reload the front page into your printer first. Note: The back design is intentionally larger than the front side. Use the front side as your guide when cutting out your wallet.
Print Wallet Back1000
mBTC


How to cut & fold your 2-sided wallet:
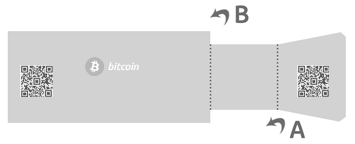
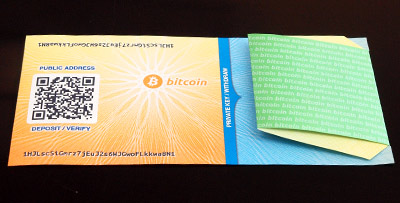
Now fold the more narrow private key area in half, and then over again as indicated by the dotted lines in this diagram. The "butterfly" shape is time-consuming to cut out, but without all those cuts and angles, someone can reveal your private key without removing the tape!
The final wallet will be a rectangle shape with the more narrow private key area folded over it.
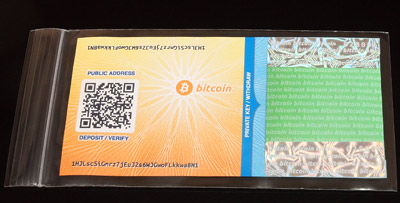
Seal your wallet by placing two strips of sturdy light-blocking tape over the top and bottom edges of the private (folded) area. A zip-seal bag will keep it safe from moisture, which is especially important when using an inkjet printer.
Purchase hologram stickers and/or zip-sealing bags »
How to add funds to your wallet:
Send s to the address (or QR code) where your wallet says "PUBLIC ADDRESS".How to withdraw funds from your wallet:
You should expect to withdraw the entire balance of the wallet by importing it (or "sweeping" it) to a live wallet, e.g. a Bitcoin wallet application or online service like blockchain.info or coinbase.com.If you elected to BIP38-encrypt your wallet, you may need to recover your unencrypted WIF "Wallet Import Format" private key by using the "validate" tab on this web page.
Tips & FAQ's
• What kind of printer and paper to use »• Adding to and spending from a paper wallet »
• How and when to use BIP38 encryption »
Validate or decrypt private key
This feature works for private keys made here as well as those generated using any other Bitcoin service or software, e.g. bitaddress.org or brainwallet.org
Enter or scan any private key to verify that the key is valid and show its corresponding public key. If your private key validates, then you may be reassured that you will able to retrieve any funds sent to that wallet.
To duplicate or BIP38-encrypt any paper wallet, just validate its private key and click the "Use these details to print a paper wallet" button.
Is your wallet BIP38 encrypted? If so, you can use this form to decrypt your private key and recover the standard Wallet Import Format (WIF) key suitable for wallet software and services that don't directly support BIP38 importing.
You may also type in a "brain wallet" passphrase to see the corresponding SHA256 hashed keys.
Scan QR code using your camera
Permission denied. Your browser should display a message requesting access to your camera. Please click the "Allow" button to enable the camera.
If you are using Chrome and you launched this generator by opening the HTML file from your own computer "locally", you may need to launch Chrome from the command line and specify the --allow-file-access-from-files flag. Or you can set up a local web server (Apache) and run this generator via http://127.0.0.1... or, give up and just use Firefox.
Public and private details for:
Use the Public Address to receive funds or check your balance online. The Private Key WIF is a code that needs to be keep secret since it can be used to spend any funds that have been sent to the corresponding public key. Keys can be encoded in a number of different formats. The most popular encoding formats (WIF, WIFC, HEX, B64) are shown below.
51 characters base58, starts with a ''